Description
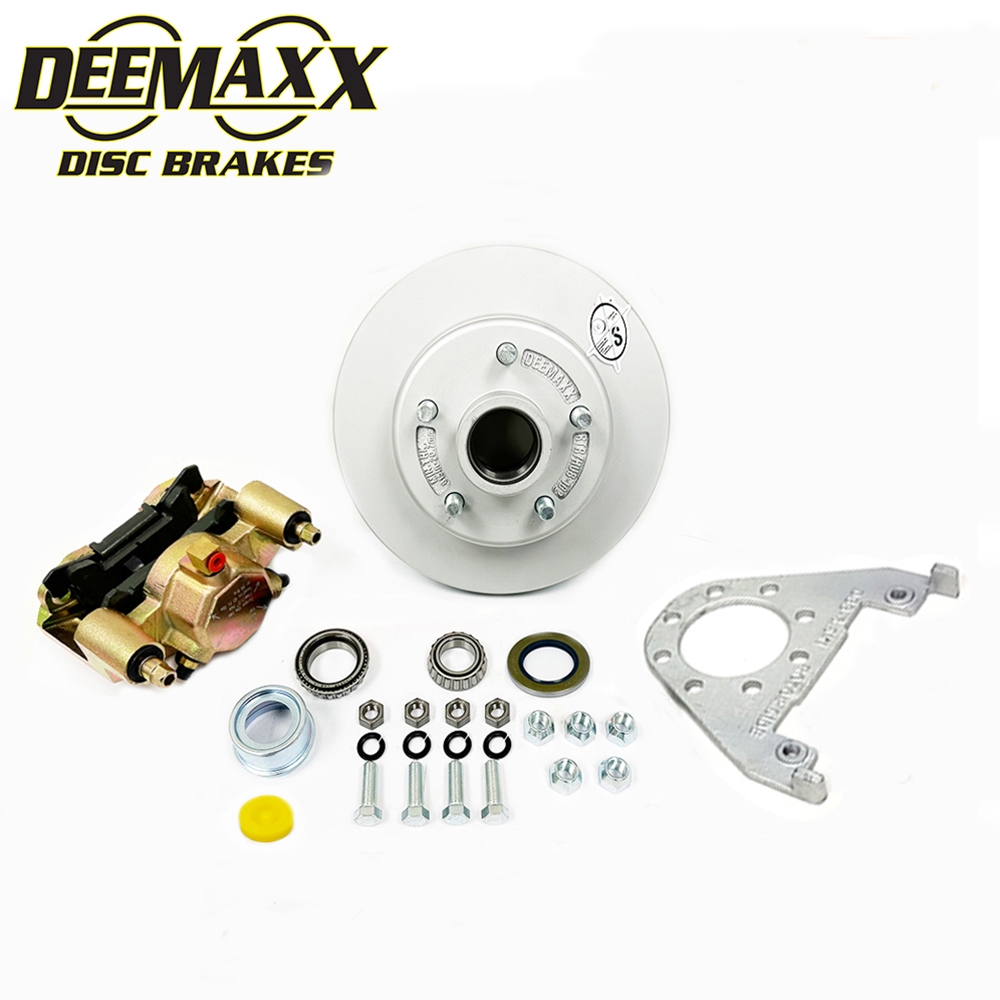
The DeeMaxx Components DeeMaxx® 3,500 lbs. Disc Brake Kit for One Wheel with Gold Zinc Caliper (Part DM35KGOLD) is a high-performance hydraulic disc brake kit designed for 3,500 lb. single axle trailers. Featuring a premium Gold Zinc Caliper, this kit offers superior stopping power, excellent heat dissipation, and outstanding corrosion resistance.
Key Features
- Part Number: DM35KGOLD
- Capacity: 3,500 lb. Axles (One Wheel)
- Brake Type: Hydraulic Disc Brake Kit
- Caliper Finish: Gold Zinc Plated
- Rotor: 10″ Integral Vented Rotor with 5 on 4.5″ bolt circle 1/2″ Studs
- Brand: DeeMaxx Components
3,500 lbs. DeeMaxx Gold Finish disc brake. 5 lug 1/2″ studs. 10″ Integral vented rotor. Unique rotor cross section design actively draws cooling air from the rotor interior! Exclusive 120º bleeder design means better bleeding, balanced system, and no more damaged bleeders! Exclusive laser writing on caliper means instructions are always there! Every caliper is tested to 2000 psi. Robust ductile iron casting eliminates flexing resulting in more brake torque. Exclusive bolt design means no more mishandling or incorrect shipping of bolts. Compatible with every surge and electric over hydraulic actuators! Ceramic brake pads are slotted, chamfered, & feature a stainless steel clip. Unique bracket design provides twice as many mounting options for caliper position. Produced in ISO Quality certified factories! Passed the SAE J2681 Brake test!
This Kit includes:
- 1 x 10″ 5 Lug Maxx Integral Vented Rotor w/ 1/2″ Studs
- 1 x Gold Caliper w/brake pads
- 1 x 3,500 lb. axle Maxx mounting bracket
- 1 x L44649 Outer Bearing
- 1 x L68149 Inner Bearing
- 1 x 1.98″ Yellow Grease Dust Cap w/Plug
- 1 x 171255TB 1.719″ x 2.561″ Double Lip Seal
- 4 x 7/16″ x 1-1/4 Bolts
- 4 x 7/16″ Lock Washers
- 4 x 7/16″ Fine Hex Nuts
- 5 x 1/2″-20 60º Lug Nuts
This DeeMaxx Gold Zinc disc brake kit provides excellent performance and corrosion protection, making it ideal for boat trailers, utility trailers, and other single-axle applications where strong, fade-resistant braking is essential.
Questions about this disc brake kit or compatibility with your trailer axle? Call our trailer experts at 1-800-866-3336.
Browse more Hydraulic Disc Brakes and trailer brakes.
DeeMaxx Disc Brake Installation Instructions
By following these step-by-step instructions, you can successfully remove your existing drum or old disc brakes and install DeeMaxx disc brakes to improve your trailer’s braking performance and safety. If you encounter any difficulties or uncertainties during this process, please contact DeeMaxx or seek assistance from a professional mechanic or trailer technician. Read all instructions before beginning installation.
- PREPARE THE TRAILER:
- Park the trailer on a flat, level surface and chock the wheels to prevent movement.
- Securely support the trailer on jack stands to provide clearance for working underneath.
- REMOVE THE WHEELS:
- With the wheels still on the ground, break the lug nuts loose. DO NOT REMOVE WHEELS YET.
- Lift the axle with a jack and remove the lug nuts and wheels. Set them aside in a safe place.
- DISCONNECT BRAKE COMPONENTS:
- If applicable, disconnect the brake lines from the wheel cylinders or disc brake caliper. Use a flare nut wrench to avoid damaging the brake line fittings.
- Remove the brake drums or old disc brakes. If they are stuck, gently tap them with a rubber mallet to loosen.
- REMOVE BRAKE ASSEMBLIES:
- Unbolt the brake backing plates from the trailer axle flanges. Be careful not to damage the axle or other components.
- Slide the brake assemblies off the axle, taking care not to damage the brake lines or other nearby components.
- INSPECT AND CLEAN:
- Inspect the axle spindles, bearings, and seals for signs of wear or damage. Replace any worn or damaged components as needed.
- Clean the spindle and surrounding area, removing any dirt, grease, or debris.
- PREPARE THE DISC BRAKE COMPONENTS:
- Gather all the components included in the DeeMaxx disc brake conversion kit, including calipers, rotors, mounting brackets, hardware, and dust cap.
- Ensure the DeeMaxx disc brake components are compatible with your trailer’s axle and hub configuration.
- MOUNT BRAKE CALIPER BRACKETS:
- Attach the DeeMaxx disc brake caliper brackets to the axle flanges using the provided bolts and nuts. The “part number side” of the bracket should face outward, away from the trailer. Ensure brackets are aligned properly, preferably at the 3 o’clock or 9 o’clock positions, depending on the side of the trailer, and securely tighten bolts.
- GREASE & INSTALL INNER WHEEL BEARINGS:
- Pack inner and outer wheel bearings with quality axle grease.
- Gently coat the inside of the hub with a light coat of grease, ensuring there is room for expansion.
- Install the inner bearing into the back of the idler hub or rotor/hub, depending on which style you are installing.
- Install axle grease seal onto the back of the idler hub or rotor/hub. Apply a gentle coat of grease to the rubber wiper lips of the seal.
- INSTALL BRAKE ROTORS:
- Slide the idler hub or rotor/hub onto the trailer’s spindle assembly, ensuring that it is seated properly against the inner bearing shoulder.
- Install greased outer bearing onto the end of the axle spindle, followed by the washer, axle nut, and cotter pin.
- Torque the axle nut to the axle manufacturer’s specifications, making sure to back off the spindle nut. Ensure the idler hub or rotor hub spins freely.
- MOUNT BRAKE CALIPERS:
- Attach the disc brake calipers to the mounting brackets using the provided bolts and lock washers.
- Ensure the calipers are aligned with the rotors and the bolts are securely tightened to 40 ft. lbs.
- CONNECT BRAKE LINES:
- Use brake lines to connect the calipers to the trailer’s brake system.
- When securing brake lines to accessory brass fittings, caliper fittings, and the actuator fitting, be careful not to overtorque the flare nut on the end of the fitting.
- BLEED THE BRAKES:
- If installing a new actuator (surge brake or EOH), begin the bleeding process by starting with bleeding the actuator and getting all of the air out of the unit.
- Fill the brake actuator’s fluid reservoir with the recommended brake fluid (DOT 3 or DOT 4).
- Use a brake bleeding kit to bleed the air from the brake lines, starting with the caliper farthest from the actuator and working towards the front. Check the brake fluid level in the reservoir of the actuator frequently throughout the bleeding process.
- Repeat the bleeding process until no air bubbles are present in the brake fluid. Top off the brake fluid in the actuator when finished with the bleeding process.
- TEST AND ADJUST:
- Test the disc brakes by applying the trailer’s brakes using the brake controller (if equipped). Ensure they respond smoothly and provide adequate stopping power.
- If using an EOH (Electric over Hydraulic) actuator, begin by setting the factory controller or stand-alone controller to EOH (Electric over Hydraulic) settings.
- Adjust the brake controller gain as needed to achieve optimal braking performance without wheel lock-up or skidding.
- FINAL CHECK AND MAINTENANCE:
- Double-check all connections, bolts, and fittings to ensure they are tight and secure.
- Inspect the disc brakes for proper alignment and clearance, adjusting as necessary.
- Inspect brake lines and ensure they are secure and not rubbing on tires, springs, or axles.
- Perform regular maintenance on the disc brakes, including inspecting brake pads and rotors for wear and replace as needed.